Friday, 2 November 2012

Engine Removal - This one's a bit picture heavy!


 How to remove your Ford Capri engine
(OHV Pinto 4 cyl)


"And you say it won't start, eh?"


 Thats the ideal picture. Nice afternoon, bit of tinkering on the car?

Removing the engine isn't actually all that hard, im pretty certain now that as a child I was dropped from some height, onto a substantially hard floor...

... and even I could do it!

Its very methodical, but its easy if you work methodically, and don't go bat***t crazy like I normally do... anyway! Without further ado! 


Tools

  1. A decent socket set, deep set preferably, as some bolts are recessed.
  2. A decent spanner set!
  3. An Irish screwdriver. Failing that, a chuffing great big mallet.
  4. Wire snips.
  5. Tape.
  6. A marker pen.
  7. He-man abilities, or a jack.
  8. Jack stands.
  9. A trolly, or anything along those lines to support the gearbox! 
  10. Pliers 
  11. Screwdriver set 
  12. Engine crane/ hoist
  13. A friend :) 
  14. Enough tea to sink a ship.


 The process....


 Put the car on flat ground, smooth preferably, this will save you loads of effort! Also make sure that there is enough room above the engine bay to lift out the engine. For me I had to roll the car out the front of the garage to make sure there was enough!

Remove the battery.

The bonnet needs to come off to allow the crane in, so thats the first thing to go, its not all that hard, and with a friend comes off pretty easy! 

First locate the bolts that hold the bonnet onto the bracket, and mark them off, there is a small amount of adjustment that can be made on this bracket, and chances are the person that put the bonnet on is less of an invalid than you, so you want to put it on as those zany Germans did all those years ago...


Simply remove the bolts and the bracket retainer on the back, KEEP THESE SAFE! At this point it might be worth hacking up some boxes and labelling everything where it came from. 

Once the bonnet is off, place it somewhere safe like on an off-cut of carpet. 


 Yes, mine is rusted to bits, and I am not sure what to do with it yet...but lets leave that for another blog?

Best thing to do now is work logically, start stripping the engine of its connections and various. I started with the electrics, as the pinto engine is basically a four wire connection! - alternator, two to distributer and one earth wire. 


Now I have electronic ignition, so how similar this is if you are still living in the 1950's with points and condenser units I do not know. But the two wires of the dizzy can be removed, one is a spade connector, and the other (earth) runs into the car's loom, so I decided to label this:


 After that continue round the engine bay removing more and more wires, if you are lucky enough to own an electric choke, that will have its own nest of wires. 


Gloves are a great idea when working with metal all the time/ I was being wussy and was really feggin cold. 

Next step, coolant system,

Its best to remove the radiator from the car because its so fragile that if you bump it when removing the engine, chances are it will be toast. Its not too hard, undo the jubilee clip on the bottom hose and pull hard. This will be followed by a stratifying "sploof" noise followed by an arm-full of rusty old manky coolant. Place a tub underneath the car if you have any mild interest in not ruining your garage, and aim to get about 3 or 4% of the coolant content in the bucket. Any more than this and you are on to a winner because IT GOES EVERYWHERE.

Of course you may have a drain plug on your radiator! use this if you do!


 Remove the radiator using the surrounding bolts and remove the rest of the coolant pipes to the carburettor and the ones into the firewall to the heater matrix.

Fuel pipes are the next to come off, this is an easy unclip of the pipe to the mechanical fuel pump on the side of the engine.

A WORD TO THE WISE!

Top the tank up before you started restoration did you? You tit.

With a full tank or the car tilted forwards fuel runs out the pipe naturally which runs along the chassis rail. Luckily with every day driving I keep about 3 or 4 litres in the tank, so it didn't **** out everywhere, but did dribble out, and with the going rate of unleaded rivalling single malt whiskey a bolt shoved down the pipe as a plug worked a treat. A professional would drain the tank and keep the  fuel in a correct container. 

Im not a professional. 


Physical connections....


Everything that is not coming out now has to be disconnected, we have already done coolant pipes, fuel pipes and electrical wiring, so now its time for cables, bolts and shafts. 

If you start at the top of the engine and work down you are much less likely to miss anything, and try removing the engine with some bolts still attached...I would never have dreamt of doing this... 


Remove the throttle cable from the carburettor, I found removing the entire assembly was easier than faffing with the cable itself. It also means no adjustment is needed when reconnecting!

Exhaust manifold, this does need to be removed, but whether or not you want to take off the intake manifold is entirely up to you. I didn't because I am lazy and its a pointless thing to do as I am stripping the engine down on a bench anyway.


You can see at the bottom of the above picture the exhaust is disconnected and moved away from the block, there should be just enough give in the pipe to move it away without taking the header off the exhaust pipe as there was in mine. However I have a performance 4-1 exhaust, the original part may not give such a luxury! Make a note of the bolts and keep them safe.

With the car jacked up crawl underneath and remove the stater motor, its only three bolts and the electrical connections. 

The sump and oil pressure sender pipe can also be seen. Top left centre of the picture.*


Boom! Out she comes! 


Next remove the oil pressure sender pipe. And the electrical connection next to it. These can be seen in the picture that I put a * by. 


ASSEMBLE THE HOIST! Exciting times people. Exciting times. 

Doing that was harder than anything previously mentioned in this blog. Jesus mother. Its a 'slot A into flange B' affair. An innuendo on wheels. 


If the car isn't on jack stands anymore it makes the removal slightly easier as the crane doesn't have to reach as high. 

Strap the engine up to the crane with a suitable means, I used a tow rope and shackles. Old seat-belts are suitable, just don't use regular rope, thin chain, spaghetti..

Take the weight just ever so slightly from the engine, so you know it won't all slump onto the gearbox when you remove the engine mounts...

Next step! Remove the gearbox bolts. Go around the bell housing and remove every single one. Yes even that little one. Which I didn't and then wondered why the engine wouldn't come out...


With the engine out you can see the bolts all around the bell housing. Bottom left is where the clutch cable goes through the bell housing, you will need to remove this too, by disconnecting the clutch cable from the fork. You will need to remove the little rubber grommet, which will have welded itself in shape. Swearing is basically mandatory at this moment. 


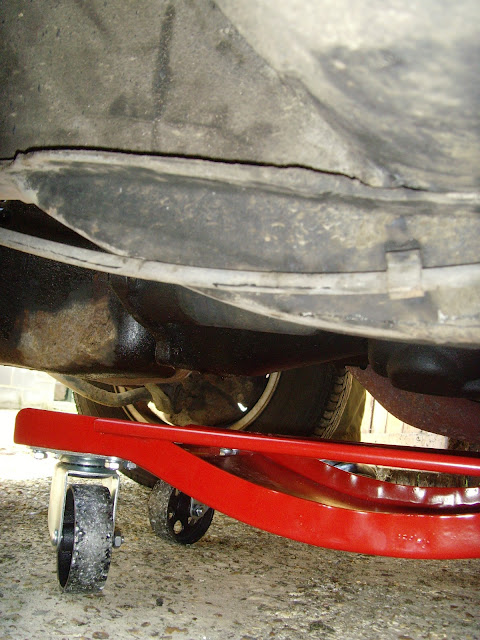
Chop up some blocks and place a trolly underneath the gearbox to support it. The engine holds alot of the gearbox weight, so this is a very necessary step unless you want to do horrible things to your propshaft! 


After this its the engine mounting bolts! 

 These can be seen in the above picture. I found it easier to unbolt the bracket as this means the engine can lift vertically up rather than having to worm it through odd angles. 

After this pull the engine forwards towards you to pull it off the gearbox splines...the engine should now be free to winch up!


Easy ay!

Rest the engine somewhere sensible, it still weighs 150kg! An old pallet is a good idea, but don't drop it on its sump as this will smash if not careful!


Well done! you have done it! Now if you have the time/ effort and haven't suffered major blood loss, a quick inspection of the engine and bay will let you know what kind of condition you pride and joy is/ was in!

Turns out mine leaked like a new born puppy!

Oil leaked from the bottom end gasket into the gearbox bell housing...

Leaked from the rocker cover....

The sump...

But worst of all...

Into the cylinders. 

Its not really a problem, but it does show a potential flaw I had with the car which was dieseling (engine run on) with the engine switched off. Read about it more with this appropriately titled topic. AHHHGGH CRAP MY ENGINE WON'T SWITCH OFF.

I am supposing that a carbon build up was the cause of mine, and this is easy to see through the exhaust ports.

Cylinder One
Cylinder Two
Cylinder Three
Cylinder Four


Its obvious that cylinder two and three are burning oil, which is probably due to nackered valve guides. Which control the oil from the head down the valve stem. But the fact that the two cylinders are next to each other worries me... 

Every cylinder is carbon..ed up due to 140k miles and no love. So a good strip down and clean will probably do wonders on its own!

Anyway! The engine strip down is for another time! Next blog is how to replace a panel part. A crash course. 


Wednesday, 31 October 2012

Part B... 10 final steps of how to remove a wing! And the door!

Well I finally decided to catch up with this blog! Quite a few things have been done now and hopefully over the next week I will get them all published up here. To let you know what you are in for...

-The engine has been removed
-Bonnet and door removal
-Interior trim removal
-Cutting and replacing panels, a crash course
-Wing restoration/ condemning


And of course the wing removal iteself. 


So here we go!

PART II OF HOW TO REMOVE A FORD CAPRI WING - AND THE PASSENGER DOOR!


(continuing from the previous post)

Step 11,

By now you wife and kids should have left you, possibly taking the car with them as equity. If this has happened im afraid the road ahead for you is over. Try www.match.com, get a new family, buy a new Capri, realise the wings on that one too are shot, and repeat step 1. 

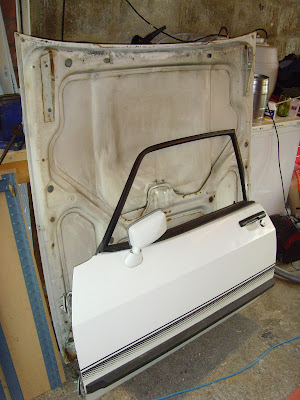
Step 12, As the front of the wing is now disconnected, you only have the back to do, but in order to do this, I'm afraid the door is going to have to come off. Its a pretty easy job, more so on the passengers side, the drivers side is a little more difficult and will be explained in a separate blog about dash removal. 

This picture should fill you full of confidence! I can do it! So can you!

Sit in the car with the door as wide open as it will go, unwind the window fully (this helps with lifting the door later) and grab a friend to lend you a hand. 

I will tell you this now THE DOOR IS HEAVY. Not horribly so, but heavier than you think if you have never picked on up before!


Step 13,

Whilst sat in the car locate the mounting bolts and pins. This picture shows the drivers side, because I forgot to take any pictures until after I removed the door. DOH!


 Don't no matter what you do attempt to disassemble the hinges, they don't make the pins any more and you will never get it to sit right! With the door open, you need to remove the plastic trim piece in the footwell.....


 There are no obvious ways of doing this, as there and no screws, the whole thing is a plastic push fit design, however if you lift up the carpet and unscrew the front of the kick plate/ strip, the removal of this is much easier! And yes, my dash is held up with some wood. This was not my doing! :S

As you can see the plastic poppers are located near the door seal, so remove a little of the door seal and the plate pops off and slides out. 


Step 14,

Remove the electrical connections and the waterproof boot. On mine the only connection was the speaker wire, so a pair of wire snips made short work of it! 

Once that plate is removed you should see this.


Sorry about the picture size but it helps to understand it! The bolts can be accessed then, three at the top and three at the bottom. The middle pin can be removed with the cir-clip (have I spelt that right?) at the bottom and then just punching it out with a screwdriver. 

Make sure someone is holding the door as you undo them!


Easy ay? A quick clean up is also a good idea to keep rust at bay, catching it early makes it dead easy, and will save you hours of problems later down the line, its also a good idea to have a quick look under the carpets. My floor is pretty solid (thank god!) but the plugs are not so good, im going to replace them pretty quick. I don't like wet feet!


Step 15,

Again this photo needs rotating, but you get the idea! You can see the spot welds as the wing connects to the A frame, drill these out and then using a hammer and a chisel follow the seam up!


As can be seen here:


 Step 16,

Before you let that wing come off, remove the indicators and the ariel!


Step 17,

Continue to pull/ drill the wing off until the whole thing becomes a bit wobbly! You should be able to start seeing more and more light through the panel gaps!


Step 18,

Head under the car and take the final few spots off, get a friend to grab the wing as slicing you in half will seriously hamper your day. 


 Step 19, 

Don't be afraid to use that old chisel! Pull apart the sandwiches of metal and it becomes much easier to do this as the wing becomes disconnected and less stable!


The body has been filled with seam sealer and other bits of rubbish from the ford factory, and bodge DIY repairs, so if something is stuck, see if a screwdriver will go through it! A hard pull got these two apart!

Step 20,


 Off comes the wing! Its inspection time now, have a good look and see what needs doing, keep rust at bay and give everything a good clean to get the road much off and all the salt. 


Job done!

Go pat yourself on the back and plaster your wounds. We are taking out the engine next!

Sunday, 30 September 2012

Part A of 10 steps to remove a wing....without destroying it!

Well hello blog world! Its been a while...


Earlier this month, I ran out of money. I don't mean, I had only a little left, I meant, a stone cold broke zilch. 

Oh dear.

Anyway! Its now the end of the month and things are starting to happen again! So let me fill you in....

The wings on the Capri, and indeed any Capri, were rusted, but not so badly that they needed to be thrown away, I think they are salvageable. But they still have to come off, and this means doing it without destroying the wing in the process. 

Balls. 

When I have read up on wing replacement, everyone just said to cut off as much metal as possible and slap on a new one! Well that isn't possible here..because I am keeping the wing!

So here we are, the First 10 steps into how to remove a wing.

Step One...

 Sit down and consider buying a new car. Whilst crying. 


Step Two...

Realise you are actually a lot mainlier than everyone thinks, and compensate by buying £150 worth of new tools. I satisfied this with a new compressor and a cut off tool! 


Look at it! Its red and everything! Nothing says matcho amateur mechanic like your shiny red tool. 
Truth be told, this is actually a very handy devise, its not quite as vicious as a conventional angle grinder, and the right angled blade is very practical! 


Step Three...

Right, put on your strong pants and have a cup of bovil ready, the next step is horrible if you have never butche....err...restored... your Capri before. 


In an ideal world, you would find the spot welds along the drip rail (seam) and drill them out one by one, and use a cold chisel to pry to the two pieces of metal apart. Apon which the wing would pleasantly plop off and we would all go inside the warm house for tea and medals. As is seen in this picture >>> 

My drip rail was made of dust. I don't know what was actually holding on the top part of the wing but it can't of been too far from magic. Cut it off if you have the same problem as me. Its actually quite enjoyable when you get past the initial terror of purposely destroying your own car! 

HOWEVER. If you do do this, cover the windscreen with something suitably tough, as the spray from the angle grinder will happily haze up you windscreen. As I did with mine. Lucky I am having to replace it then ay!


This picture shows how much awesome fun it can be! 


Step 4...

Stand back and admire your shocking handywork. If you have done it correctly, the cut should be cock eyed and wonky. Preferably you should also be bleeding. If not repeat step 3. If your cutting is as sketchy as mine, go over the seam with a metal grinding disk, and take back any edges to flush metal. Giving it a cheeky spray of WD 40 will also stop rust from forming if you are leaving it unpainted for a week or so. Any more a coat of primer wouldn't go amiss.

Step 5...

After cutting the seam off, try to prise the wing away from the inner wing as much as you can, a chisel and a hammer work magic here. As you can see the front part of my inner wing is dust anyway, so this came away with relative ease! Rust for once was a help! But it does mean I have to replace the front section of the wing in due course....


Step 6...

Chase the seam around the headlight bowls, some cutting may be needed here as this is where rust usually holds the wing on rather than any mechanical means! If you are re-using the wing as I am, I suggest you re-weld on a new drip rail to the inner wing, and then weld on outer wing supports. Push the wing so that the panel gap between the bonnet and wing are correct again, and mark on the inner wing with paint of tip ex (if you don't have a white capri!) where the two meet up so that when you put the wing back on, finding the correct fitment position won't be a pain in the arse! This will be included in the next part called "10 MORE STEPS TO REMOVE AND RESTORE A WING!'

If you continue to follow the seam around you will work your way into the headlight bowl surround. As seen again on mine, this is just rust (can anyone else see the re-occouring theme here?) so a quick grind and the thing came off.


Again in an ideal world you would drill out the spot welds and the tab would unpop. If you can see the tab in the above picture you are a better person than me. Because its vanished in a pile or corrosion!


Step 7...

Bring on the fun! After that seam there are only three bolts holding on the front of the wing.

Bah...its only three bolts! How hard could that be!

A days work.

Here are the culprits...

There is one out of view in this picture, but thats the three. The picture needs to be rotated but the button appears to have disappeared. Please tilt your head 90 degrees left. 

After introducing penetrating fluid and heat two of them came off. The third (lowest) was stuck fast, so I just cut right through the tab with my the cut off tool.


It is a tad out of focus, but you get the idea! After which, the front part of the panel should look like this...


If you have done it properly your socket set should look like this:


Oh well serves me right for using cheap tools! I thought I had rounded the head of one bolt, to find the bolt head sharp as a knife, but the socket rounded!

Whaaa?

Step 8...

Swear. A lot. Or beast your children if you have them. You should have no knuckles if you have managed to get the bolts off. Less skin = Job well done. 

Step 9...

Plan. 

If like me you are going to be putting the wing back on after refurbishment, then leave reference marks everywhere so that the panel will fit back on a dream (in theory!) without having to bash it into shape. Take your time when removing the wing, its not a race, and you will find it will come off quicker if you are not in a rush. I am lucky in having two cars, so when I get fed up with the capri I can go inside and still make it to work in the morning! If you do not have this luxury...get back in the garage. 

Step 10...

I don't have a 10th. Apparently I overstepped myself looking for a catchy title. I suppose you could use this step to clean the garage? Or play with the cat? 

In the next instalment I will go over removing the back of the wing. I will post a link to that in this blog when I have written it. 


ISN'T SHE PRETTY! And yes she is running! Hearing it start up from time to time makes you remember the car is still alive, and after all your hard work, you will be able to enjoy her blasting down some B roads.

Until you break down ;)

F *****s
O nly 
R oll
D ownhill


PART B NOW OUT! Finish off that wing guys!

WING REMOVAL PART II